An Eclipse Expedition to Oregon

Every month, during new moon, the Moon passes between the Earth and the Sun. Unfortunately, due to the Moon’s tilted orbit, it usually passes just above or below the Sun, making those of us here on Earth oblivious to its passage. Twice a year though, the Moon passes through the plane of our orbit around the Sun during new moon, leading to a solar eclipse. Some of these eclipses are partial, where the Moon takes a bite out of the Sun, typically unbeknownst to those not monitoring the skies with eclipse glasses. More spectacular are the total eclipses, which occur when the Moon is close enough to us in its elliptical orbit that its disk is large enough to fully obscure the Sun, turning day briefly into dusk. A third option occurs when the Moon is farther away from us in its elliptical orbit. Even if the geometry is correct to produce a total eclipse, the Moon’s smaller size in this case means its not large enough to fully cover the Sun. This results in an annular eclipse, in which a ring (or “annulus”) of sunlight is visible around the dark circle of the new moon.
Partial eclipses are a dime a dozen, but given the small size of the Moon’s shadow relative to Earth, total and annular eclipses can only been seen from a narrow strip of land. Stand even a few meters outside that band, and you’ll see just a partial eclipse. I’ve seen probably half a dozen partial eclipses over the years, and in 2017, we made the eight hour drive from southern Utah to Riverton, WY to see a total solar eclipse. (The drive ended up being twice as long on the return, due to “eclipse traffic.”) That experience was spectacular, and immediately led to conversations about when we could see another.
While annular eclipses don’t provide quite the all-encompassing sensory experience of a total eclipse, I was nevertheless excited to complete my own personal “eclipse trifecta” by travelling to Oregon last weekend for the October 14, 2023 annular eclipse. The last annular eclipse visible from the United States was over a decade ago, on May 20, 2012, when the path of annularity swept across the American Southwest. That date just happened to correspond with my undergraduate commencement ceremony, which was sadly not in the path of annularity. This prompted me to inquire with school officials about whether attendance was required to receive my degree. I was told it was, and thus that eclipse expedition ended before it began.
The 10/14/23 eclipse had been circled on my calendar for a long time, especially since we moved to Washington in 2019 and would be just a few hours north of the path of annularity. I had grand plans of leading a field trip for my students, but a national shortage of 12-passenger vans thwarted that idea months ago. Instead, on the evening of October 13th, my wife and I made the 4.5 hour drive from central Washington to La Pine State Park in Oregon, just inside the annular eclipse track. The weather forecast had been looking poor for the past week, and the last hour of the drive was through a steady rain. However, forecasts for the eclipse morning had slightly improved over the past 24 hours, and it seemed there would be at least a chance for some clearing around eclipse time. The campground was full, which I’m guessing was out of the ordinary for a wet, cold, weekend in mid-October.
The morning of the eclipse dawned cold and mostly cloudy, though there were patches of blue sky visible here and there. We decided to head southeast, away from the Cascades, to improve our chances of clear skies. After about an hour of driving, through intermittent patches of eclipse traffic, we arrived on the rim of “Hole-in-the-Ground,” a ~1 mile wide volcanic crater known as a marr, formed when magma encountered shallow groundwater about 15,000 years ago, resulting in a large explosion. Several dozen other groups were camped out on the rim of the hole in the hopes of seeing the eclipse. We pulled off into the sage with about half an hour to go until the start of the annular eclipse. The skies looked grim, with the patches of blue from an hour earlier having given way to a nearly uniform layer of gray mid-level clouds. We briefly debated weather to high-tail it east toward an area of sunlight on the horizon an unknown distance away, but eventually decided we probably wouldn’t make it in time.

This turned out to be the right call. About 15 minutes before annularity began, a hole in the clouds began to materialize and we caught our first glimpse of the partially eclipsed Sun:

With the Sun nearly 90% eclipsed at this point, the light began to take on a noticeably unnatural tone, much as it did in the final minutes before the total eclipse in 2017. The gap in the clouds became steadily larger, as did our excitement at the prospect we might actually see the celestial alignment we had come for. At 9:20 am, annularity began, right on schedule, as the Sun peered down through the only sizeable break in the clouds for miles around. Joyous shouts of excitement echoed across the hole as other parties spotted the hole-in-the-sun through the hole-in the-clouds from the hole-in the-ground. What cosmic symmetry!
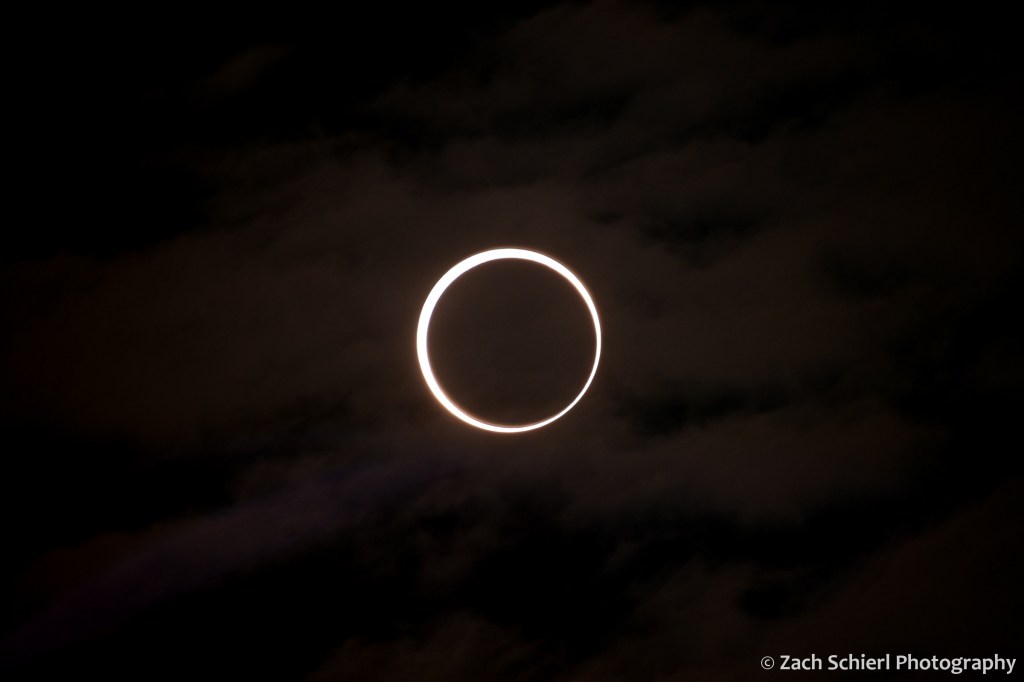
The extra hour of driving had bought us an additional minute or so of annularity, for a total of just under four minutes. That time flew by. By the time we looked through the telescope a few times and snapped a few pics, the annular eclipse was over. The clouds sealed back up again about 10 minutes after annularity ended.

Having seen what we came to see, it was now 10:00 am on a beautiful (if you’re not trying to see an eclipse) and pleasant weekend in central Oregon. We spent the rest of the weekend going on some short hikes and enjoying some great food in Bend before returning home.


Comet NEOWISE Appears in the Morning Sky

Naked-eye comet alert! Comet C/2020 F3 (NEOWISE), discovered back in March, has brightened to the point where it is visible to the naked-eye in the pre-dawn sky. Both the comet and its tail were easily visible to the naked eye about one hour and fifteen minutes before sunrise this morning:
Comet C/2020 F3 (NEOWISE) at 4:05 am PDT on July 8, 2020 from Yakima County, Washington. (Nikon D750, 260mm, f/5.6, ISO 400, 1.6 sec)
This is the first time in ~20 years of skywatching that I can recall seeing a comet and its tail with the naked eye. (Western Washington’s persistent clouds and 49°N latitude stymied my attempts to see Comet PANSTARRS in 2013.) Such comets are relatively uncommon, making it well worth the effort to get up to see this one.
Here’s how to see it yourself:
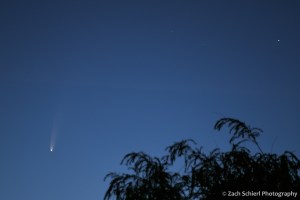
Look northeast 75-90 minutes before local sunrise. You’ll need a relatively clear horizon in that direction. For most locations in the United States, the comet will be no more than 10 degrees above the horizon at this time. A large tree 200 yards away was enough to block the view of the comet from my patio, forcing me to take a short stroll through the neighborhood to find a better vantage point. The comet is small, but for at least the next few mornings should be readily visible. Here’s a wide field view to give you a better sense of the comet’s apparent size:

Comet C/2020 F3 (NEOWISE) at 4:02 am PDT on July 8, 2020 from Yakima County, Washington. (Nikon D750, 70mm, f/2.8, ISO 400, 1 sec)
Timing is key. My experience is that the comet is best seen about 75-90 minutes before local sunrise. Too much earlier and the comet will be too low in the sky to see clearly. Too much later and the brightening dawn sky will render it invisible. This morning, by about one hour before sunrise, the comet had become much more difficult to pick out and the tail was barely visible to the naked eye. By 45 minutes prior to sunrise, the comet was no longer visible to the naked eye at all (although it was still visible in binoculars or a camera).
Since you’ll be observing in twilight, light pollution conditions shouldn’t make much of a difference here; this comet should be visible even from urban areas, provided you have a clear northeast horizon and time your attempt correctly. A pair of binoculars greatly enhances the view. For more detailed information on viewing Comet NEOWISE, check out https://earthsky.org/space/how-to-see-comet-c2020-f3-neowise
Now for a bit more on what you are seeing and how the comet’s appearance might change over the coming days and weeks:
Comets are city-sized “dirty snowballs” made mostly of ice and rock. They are leftovers from the formation of our Solar System and orbit the Sun on highly elliptical paths. Comet NEOWISE takes several thousand years to complete one orbit of the Sun. While comets spend most of their time in the cold outer solar system, when they approach the Sun they are heated by solar radiation, causing ices on the comet to begin sublimating (turning from a solid into a gas). This creates a temporary atmosphere surrounding the comet nucleus known as the coma. That’s the bright part of the comet you see in the close-up below. A stream of ionized gas “blown” off the comet by the solar wind can form a tail, while dust particles left behind the comet can form a second tail. As you can see in the close-up, Comet NEOWISE does appear to have two distinct tails at the moment.

A close up of the coma and twin tails of Comet C/2020 F3 (NEOWISE).
NEOWISE made its closest approach to the Sun back on July 3rd and is now on its way back into the outer solar system. Typically, as comets move away from the Sun’s heat, they dim. So far though, NEOWISE appears to be bucking the trend. This is exciting because while the comet is moving away from the Sun, it is moving closer to us. It will reach its closest point to Earth by about July 22nd. If the comet can maintain its brightness for just another week or two, the show could get even better. Now is still the time to look though. The comet will be visible in the morning sky for just a few more days before it disappears into morning twilight. It will reappear in the evening sky by mid-July. Here’s hoping it is still bright enough to see by then. If so, we can all enjoy its presence without having to get up at 3:30 AM!
Photographing the Night Sky from Colorado

Colorado is a great place for those of you who, like me, are perpetually torn between looking up and looking down. Colorado’s spectacular geologic landscapes keep me occupied during the day, but at night a whole different world opens up overhead. Colorado is a great place to look at and photograph the night sky for several reasons:
- It’s relatively dark. With the exception of the Front Range megalopolis (where I now live), there are few egregious sources of light pollution, especially when compared to just about every state east of here.
- It has the highest average elevation of any state. This is important because looking through the Earth’s atmosphere at the stars is like looking through a glass of water at a friend sitting next to you. The higher you go, the thinner the atmosphere becomes, and the better and steadier your view of the night sky.
- It has good weather. Clear skies can be found regularly throughout the year, unlike in the black hole of astronomy known as the Pacific Northwest.
- It has lots of public land where you can theoretically spend all night outside taking photos without fear of getting shot.
I spent a good chunk of this past summer honing my astrophotography skills and if you’ve never tried your hand at it, I encourage you to give it a try. It has certainly made me a better all-around photographer. First and foremost, astrophotography is an exercise in patience, both at the camera itself and then in front of the computer afterwards, and patience is a valuable virtue in all aspects of photography. Ironically, as comfortable as I am outside under the stars, astrophotography actually pushes out of my comfort zone photographically. Apart from minor brightness or contrast adjustments and cropping, I tend to eschew significant post-processing of my photos. When photographing the night sky though, some quality alone time with Photoshop and Lightroom is pretty much a necessity in order to get something that looks good.
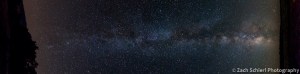
The summer Milky Way spans the sky from horizon to horizon as seen from near Delta, Colorado. The galactic center is located just above the southern horizon (right).
I’m not here to give you a step-by-step guide to night sky photography, that’s been done before (try here, here, or here), but simply to encourage you to try it. All you really need to get started is a DSLR, a tripod, some patience, and somewhere dark. Like ACTUALLY dark. Sadly, light pollution has gotten so bad that most people reading this will have never seen a truly pristine night sky. Driving to the suburbs does not qualify as “dark”. Here in the Denver/Boulder/Fort Collins light pollution-opolis, even after driving two hours up to 12,000 feet in Rocky Mountain National Park, you’ll still only see roughly HALF as many stars as can be seen with the naked eye from a truly dark location. To see if there are any pristine night skies near you, check out this nifty site, which is basically Google Maps with an overlay of light pollution severity. You’re looking for areas with the darkest black color and as you’ll see, they are becoming few and far between.
What’s great is how many different ways there are to incorporate the night sky into your photos. With wide-field astrophotography, the entire night sky is the star of the show (pun intended). Accomplished by using fast, wide-angle lenses combined with relatively short exposures (30 seconds or less, unless you have a motorized mount), this method can reveal spectacular detail in the night sky unseen by the human eye, such as the spectacular interstellar dust lanes in the Milky Way. If you pair the Milky Way with a terrestrial landscape illuminated by moonlight, the possibilities for composing spectacular nightscapes become nearly infinite.

Close-up of the center of the Milky Way Galaxy. Dark arms of starlight-obscuring dust, star clusters, and emission nebulae (pink) are visible in this 1-minute exposure.
Longer exposures (or lots of short ones “stacked” together) document the motion of the stars across the night sky. I have a soft spot for star trails because they are a beautiful reminder that the world we live in is in constant motion; the dramatic and graceful arcs traced out by the stars are due to OUR rotation, not the stars. Star trails centered around the North Star (Polaris) can be especially striking since the north star is almost exactly above the rotational axis of the Earth, and thus moves very little throughout the night.

Star trails (centered on Polaris) over Escalante Canyon, Colorado
Probably the most challenging type of astrophotography, and really the only one that requires specialized (often expensive) equipment, is telescopic imaging. My experience in this category is limited, given the aforementioned factors (donations always happily accepted!), but I’ve tried it on a handful of occasions by using friend’s equipment or telescopes at observatories I have worked at. Telescopic astrophotography allows detailed images of galaxies, star clusters, and nebulae, many of which are not even visible to the naked eye. While good images can be obtained by fitting a DSLR to a telescope (below, center and right), the best images are obtained using stand-alone CCD cameras optimized for astrophotography (below, left).

A variety of galaxies and nebulae imaged via telescope.
Some objects, like the Moon, are big and bright enough that a telescope is not needed to get decent images. I got this photo of last month’s total lunar eclipse with a standard 55-200mm zoom lens, and even had enough light gathering ability to capture the planet Uranus less than a degree away from the Moon!

Total lunar eclipse on October 8 2014, as seen from Fort Collins, CO
Beyond the technical challenge, what ultimately thrills me most about astrophotography is being able to capture photons that have been en route towards us across the vast universe for dozens, hundreds, or even millions of years. After that long of a journey, it feels like our duty to ensure that at least some of those photons have the honor of being recorded in some state of permanence. Give it a try and it won’t be long before you find yourself in the middle of nowhere waiting for your camera to finish a 1-hour exposure. A perfect change to sit back and ponder the vastness of the universe looming over your head.
