An Eclipse Expedition to Oregon

Every month, during new moon, the Moon passes between the Earth and the Sun. Unfortunately, due to the Moon’s tilted orbit, it usually passes just above or below the Sun, making those of us here on Earth oblivious to its passage. Twice a year though, the Moon passes through the plane of our orbit around the Sun during new moon, leading to a solar eclipse. Some of these eclipses are partial, where the Moon takes a bite out of the Sun, typically unbeknownst to those not monitoring the skies with eclipse glasses. More spectacular are the total eclipses, which occur when the Moon is close enough to us in its elliptical orbit that its disk is large enough to fully obscure the Sun, turning day briefly into dusk. A third option occurs when the Moon is farther away from us in its elliptical orbit. Even if the geometry is correct to produce a total eclipse, the Moon’s smaller size in this case means its not large enough to fully cover the Sun. This results in an annular eclipse, in which a ring (or “annulus”) of sunlight is visible around the dark circle of the new moon.
Partial eclipses are a dime a dozen, but given the small size of the Moon’s shadow relative to Earth, total and annular eclipses can only been seen from a narrow strip of land. Stand even a few meters outside that band, and you’ll see just a partial eclipse. I’ve seen probably half a dozen partial eclipses over the years, and in 2017, we made the eight hour drive from southern Utah to Riverton, WY to see a total solar eclipse. (The drive ended up being twice as long on the return, due to “eclipse traffic.”) That experience was spectacular, and immediately led to conversations about when we could see another.
While annular eclipses don’t provide quite the all-encompassing sensory experience of a total eclipse, I was nevertheless excited to complete my own personal “eclipse trifecta” by travelling to Oregon last weekend for the October 14, 2023 annular eclipse. The last annular eclipse visible from the United States was over a decade ago, on May 20, 2012, when the path of annularity swept across the American Southwest. That date just happened to correspond with my undergraduate commencement ceremony, which was sadly not in the path of annularity. This prompted me to inquire with school officials about whether attendance was required to receive my degree. I was told it was, and thus that eclipse expedition ended before it began.
The 10/14/23 eclipse had been circled on my calendar for a long time, especially since we moved to Washington in 2019 and would be just a few hours north of the path of annularity. I had grand plans of leading a field trip for my students, but a national shortage of 12-passenger vans thwarted that idea months ago. Instead, on the evening of October 13th, my wife and I made the 4.5 hour drive from central Washington to La Pine State Park in Oregon, just inside the annular eclipse track. The weather forecast had been looking poor for the past week, and the last hour of the drive was through a steady rain. However, forecasts for the eclipse morning had slightly improved over the past 24 hours, and it seemed there would be at least a chance for some clearing around eclipse time. The campground was full, which I’m guessing was out of the ordinary for a wet, cold, weekend in mid-October.
The morning of the eclipse dawned cold and mostly cloudy, though there were patches of blue sky visible here and there. We decided to head southeast, away from the Cascades, to improve our chances of clear skies. After about an hour of driving, through intermittent patches of eclipse traffic, we arrived on the rim of “Hole-in-the-Ground,” a ~1 mile wide volcanic crater known as a marr, formed when magma encountered shallow groundwater about 15,000 years ago, resulting in a large explosion. Several dozen other groups were camped out on the rim of the hole in the hopes of seeing the eclipse. We pulled off into the sage with about half an hour to go until the start of the annular eclipse. The skies looked grim, with the patches of blue from an hour earlier having given way to a nearly uniform layer of gray mid-level clouds. We briefly debated weather to high-tail it east toward an area of sunlight on the horizon an unknown distance away, but eventually decided we probably wouldn’t make it in time.

This turned out to be the right call. About 15 minutes before annularity began, a hole in the clouds began to materialize and we caught our first glimpse of the partially eclipsed Sun:

With the Sun nearly 90% eclipsed at this point, the light began to take on a noticeably unnatural tone, much as it did in the final minutes before the total eclipse in 2017. The gap in the clouds became steadily larger, as did our excitement at the prospect we might actually see the celestial alignment we had come for. At 9:20 am, annularity began, right on schedule, as the Sun peered down through the only sizeable break in the clouds for miles around. Joyous shouts of excitement echoed across the hole as other parties spotted the hole-in-the-sun through the hole-in the-clouds from the hole-in the-ground. What cosmic symmetry!
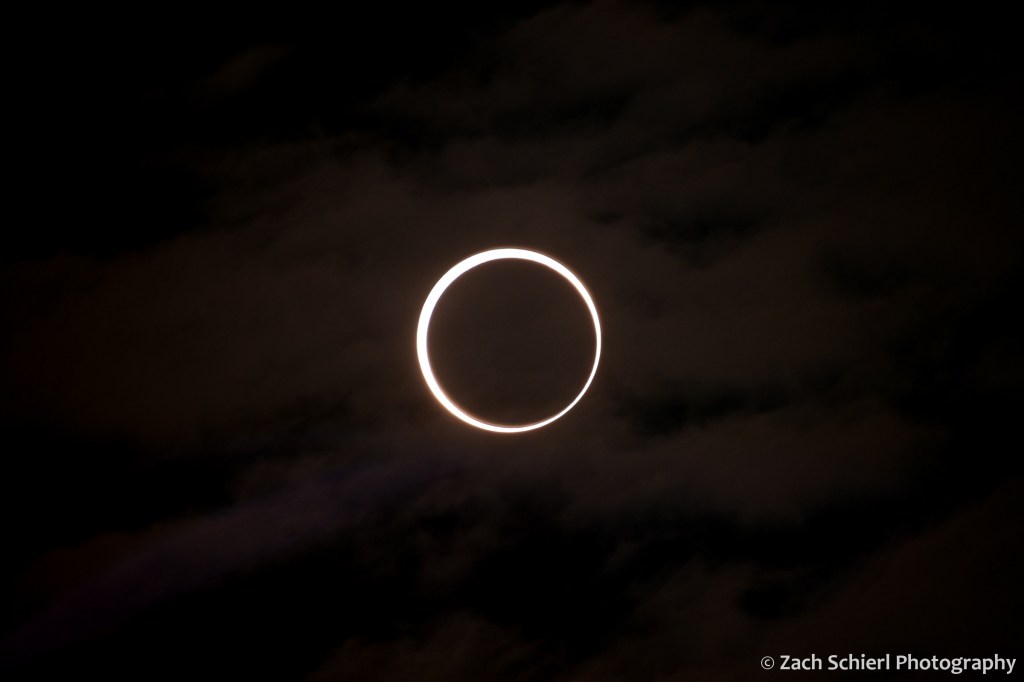
The extra hour of driving had bought us an additional minute or so of annularity, for a total of just under four minutes. That time flew by. By the time we looked through the telescope a few times and snapped a few pics, the annular eclipse was over. The clouds sealed back up again about 10 minutes after annularity ended.

Having seen what we came to see, it was now 10:00 am on a beautiful (if you’re not trying to see an eclipse) and pleasant weekend in central Oregon. We spent the rest of the weekend going on some short hikes and enjoying some great food in Bend before returning home.


Halos, arcs, and bows…oh my!

Double rainbow near Gunnison, Colorado
The term “landscape photography” is a misnomer in some ways. After all, many of the most interesting and unique landscape shots are those in which something unique or interesting is happening in the sky: a vibrant sunset bathing the land in a golden glow, an ominous storm looming on the horizon, or a terrestrial scene backed by a sky awash in stars. A colorful sky, interesting clouds, or a stray meteor can single-handedly liven up otherwise passé landscapes. As a longtime astronomy educator, I have a habit of looking up…a habit that often pays photographic dividends. I had an astronomy professor in college who would often remark that “most people just don’t look up”, a sad but true (save for perhaps an occasional glace at the clouds on a stormy day) acknowledgement of just how little attention most of us pay to the sky above us.
One of the things that we miss by not looking up is a myriad of features that result from the interaction of sunlight with water droplets or ice crystals in our atmosphere. These features lack a catchy collective name, but scientifically are often referred to as atmospheric optical phenomena. Perhaps the most frequently observed example is the humble rainbow:

Rainbow over the Wenatchee National Forest in central Washington. This photo was taken in the early afternoon, with the Sun still relatively high in the sky, thus the arc of the rainbow appears quite close to the ground and only a small portion is visible.
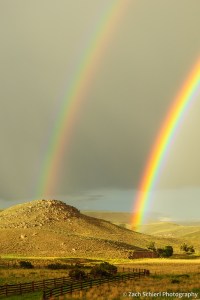
The colorful band of light in a rainbow results from a process known as dispersion. When sunlight passes through water droplets in the Earth’s atmosphere, different colors of light are refracted (or “bent”) by different amounts as they pass through the droplet, thus spreading out the colors that make up “white” sunlight into a rainbow. The water droplets don’t have to be rain; sea spray or the mist of a waterfall can do the trick as well. The geometry of dispersion is such that the center of a rainbow’s curvature will always be directly opposite the Sun. Consequently, the largest and grandest rainbows are seen near sunrise or sunset (see photo below) when our star is low on the horizon. In contrast, when the Sun is higher in the sky, only a small portion of the arc will be visible (see photo above).

Double rainbow near Gunnison, Colorado. This rainbow appeared not long before sunset, when the Sun was low in the sky, thus nearly an entire semi-circle is visible.
The light source for a rainbow need not be the Sun either. Light from the Moon can also be dispersed through water droplets, with a similar result. The caveat? Even a bright full moon is about 400,000 fainter than the Sun, so the resultant moonbow is much fainter than a rainbow and the colors not bright enough to trigger the color-seeing cones in our eyes. Thus, a moonbow appears monochromatic. I’ve only ever witnessed this eerie phenomenon once: on a damp and muggy evening on the north coast of New Zealand’s South Island, and unfortunately did not have the wherewithal to capture a photo at the time.
Moving beyond water droplets, the possibilities when sunlight interacts with tiny ice crystals in our atmosphere (such as those that comprise high altitude clouds like cirrus and cirrostratus) are myriad. Depending on the shape, size, and orientation of said crystals, the height of the clouds, and the location of the Sun, a wide range of atmospheric phenomena can result when we see the Sun through these high-altitude icy clouds.
One of the most common is the 22° halo, a ring of light that encircles the Sun (or the Moon) at a radius of (you guessed it) 22 degrees:

22 degree halo, Lake Crescent, Olympic National Park, Washington. Blocking out the Sun (with a stick in this case) is often necessary to get a decent photo of these halos.
These halos can be a little difficult to spot (and photograph…) due to the Sun’s glare, but in most locations they are, statistically speaking, much more common than rainbows. Like rainbows, these halos are caused by dispersion as sunlight passes through tiny ice crystals in the atmosphere. If you look VERY carefully (such as in the photo above), you can see that the inner edge of the halo is reddish while the outer edge is bluish.
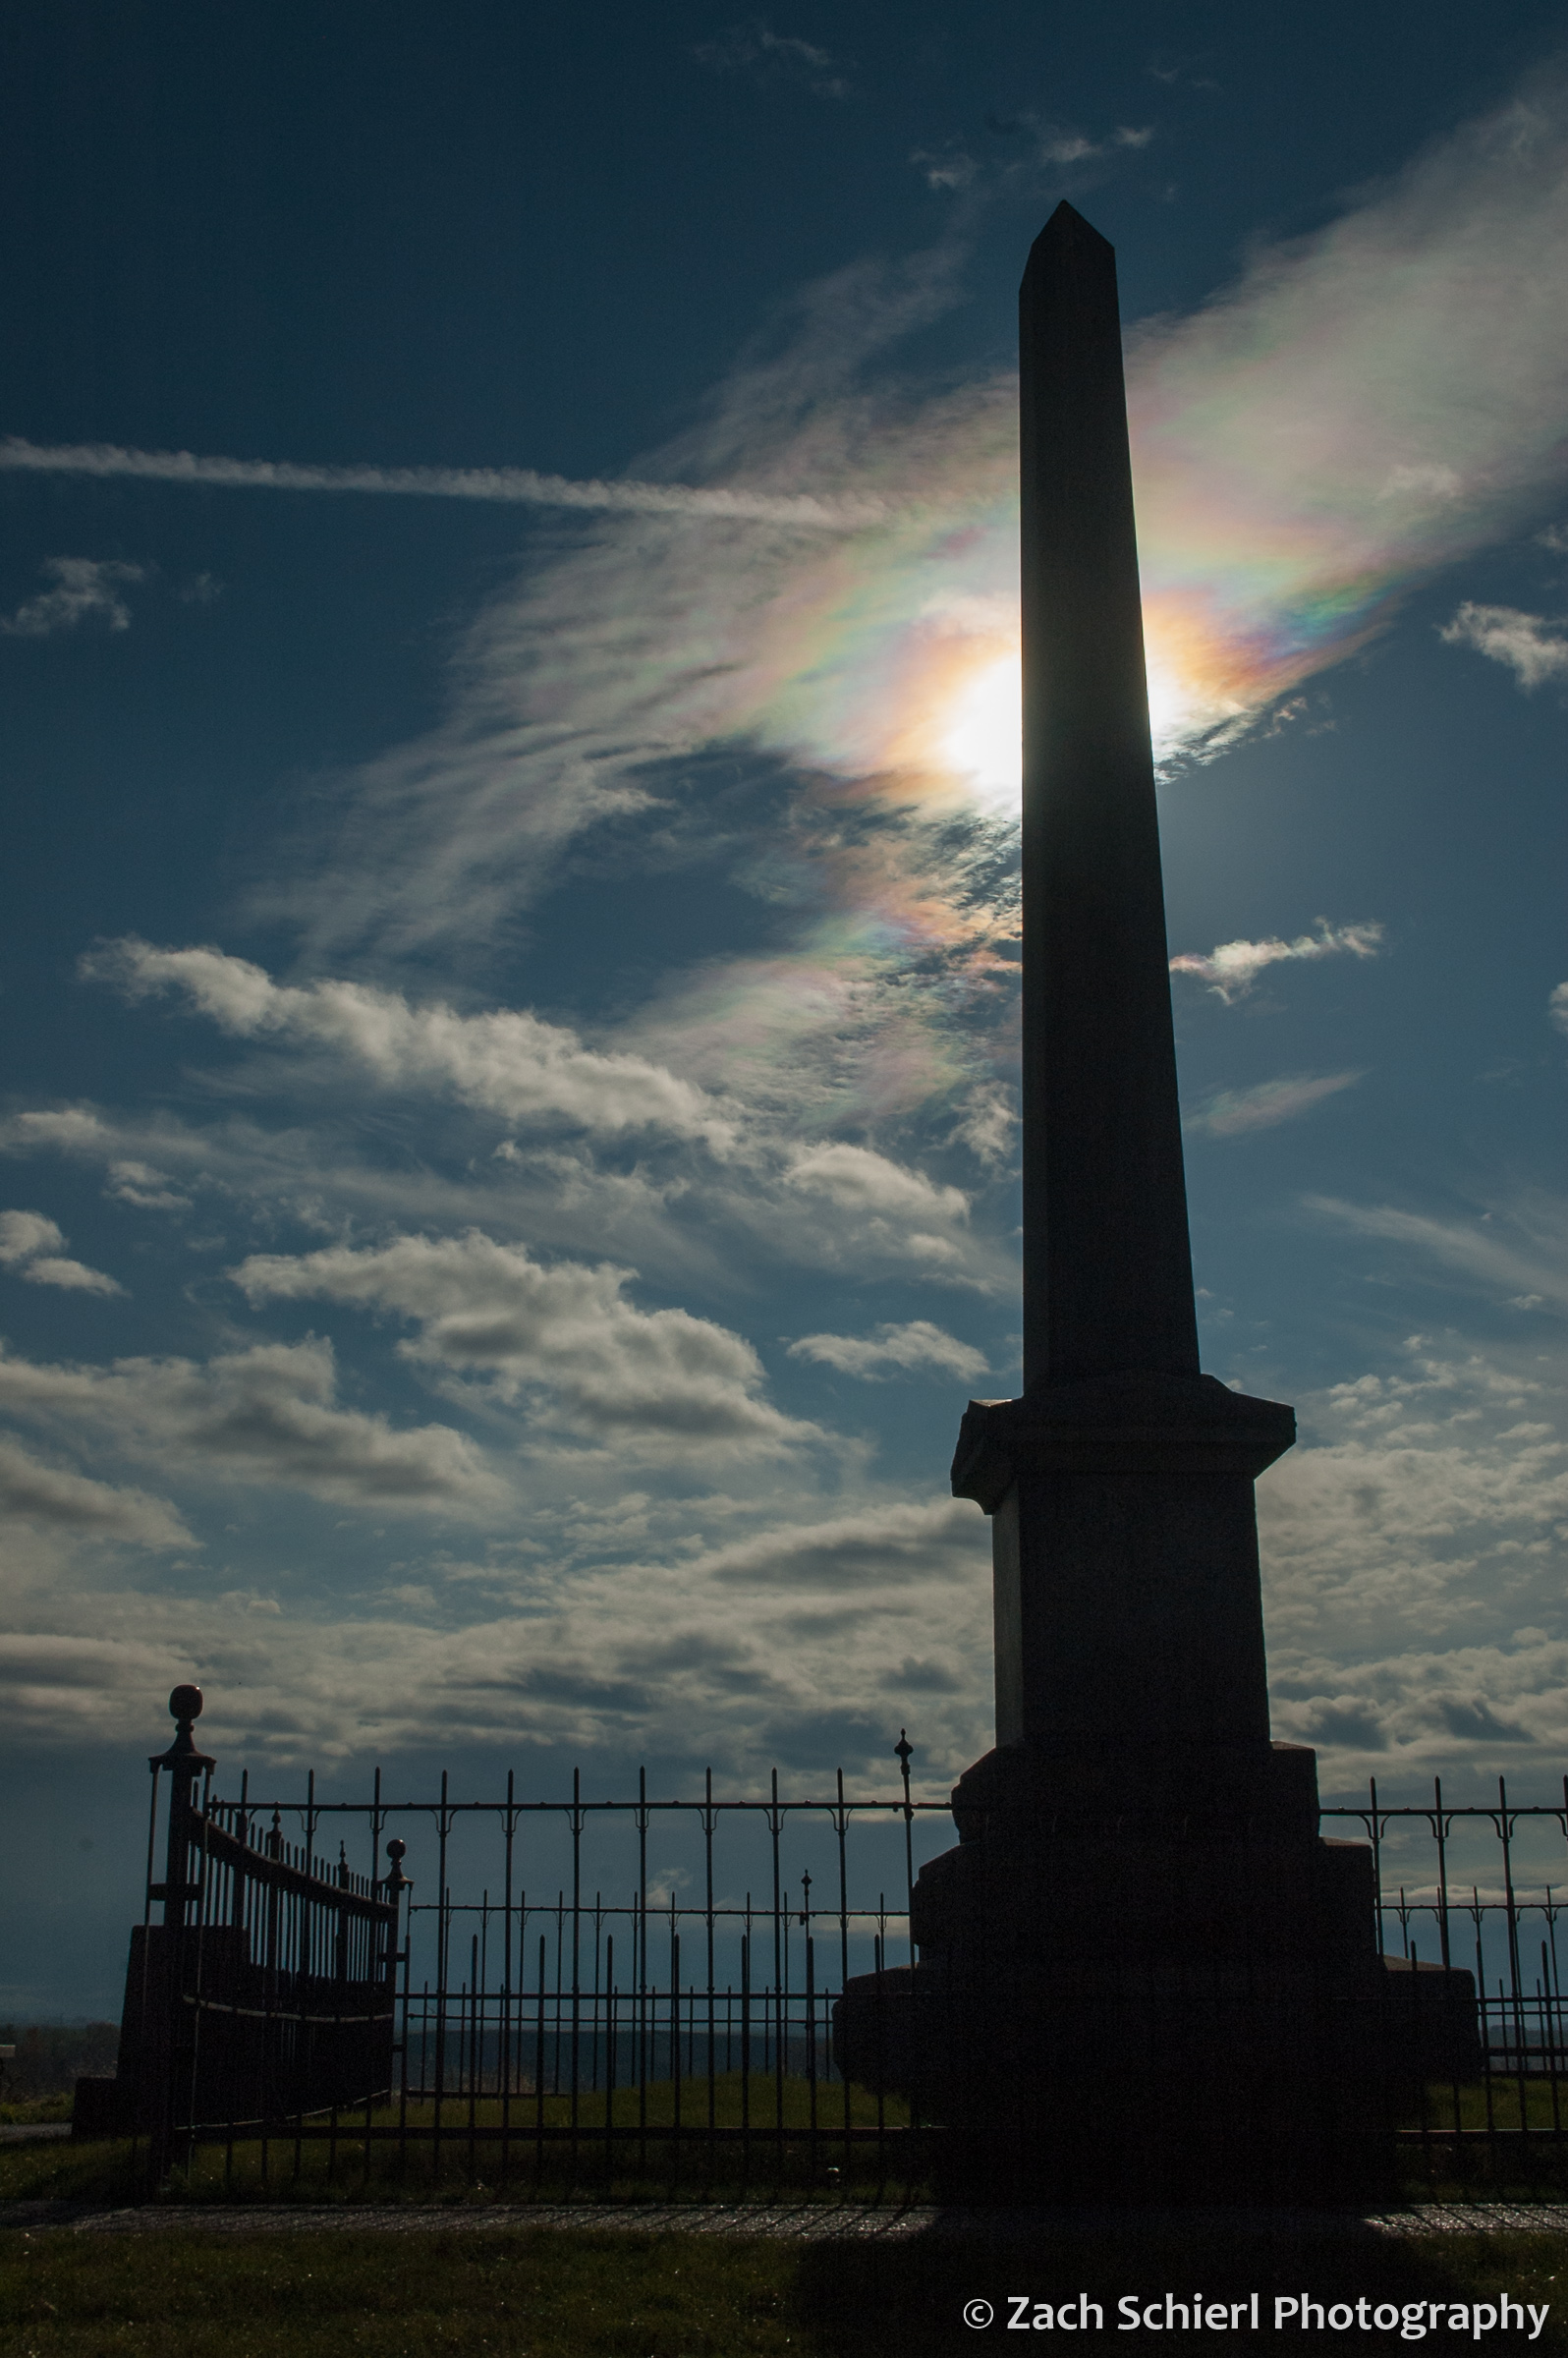
The name “22° halo” suggests that halos can appear at other distances from the Sun as well, which is indeed the case. Another member of the halo family is the circumhorizontal arc, a halo that takes the form of a brightly colored band circling the horizon at a radius of 46° from the Sun. Unlike 22° halos, circumhorizontal arcs are rarely visible in their entirety. Instead, you’ll usually only see one or two small fragments in areas of the sky where the background consists of the correct type and height of cloud. These fragments look like pieces of a rainbow oriented parallel to the horizon:
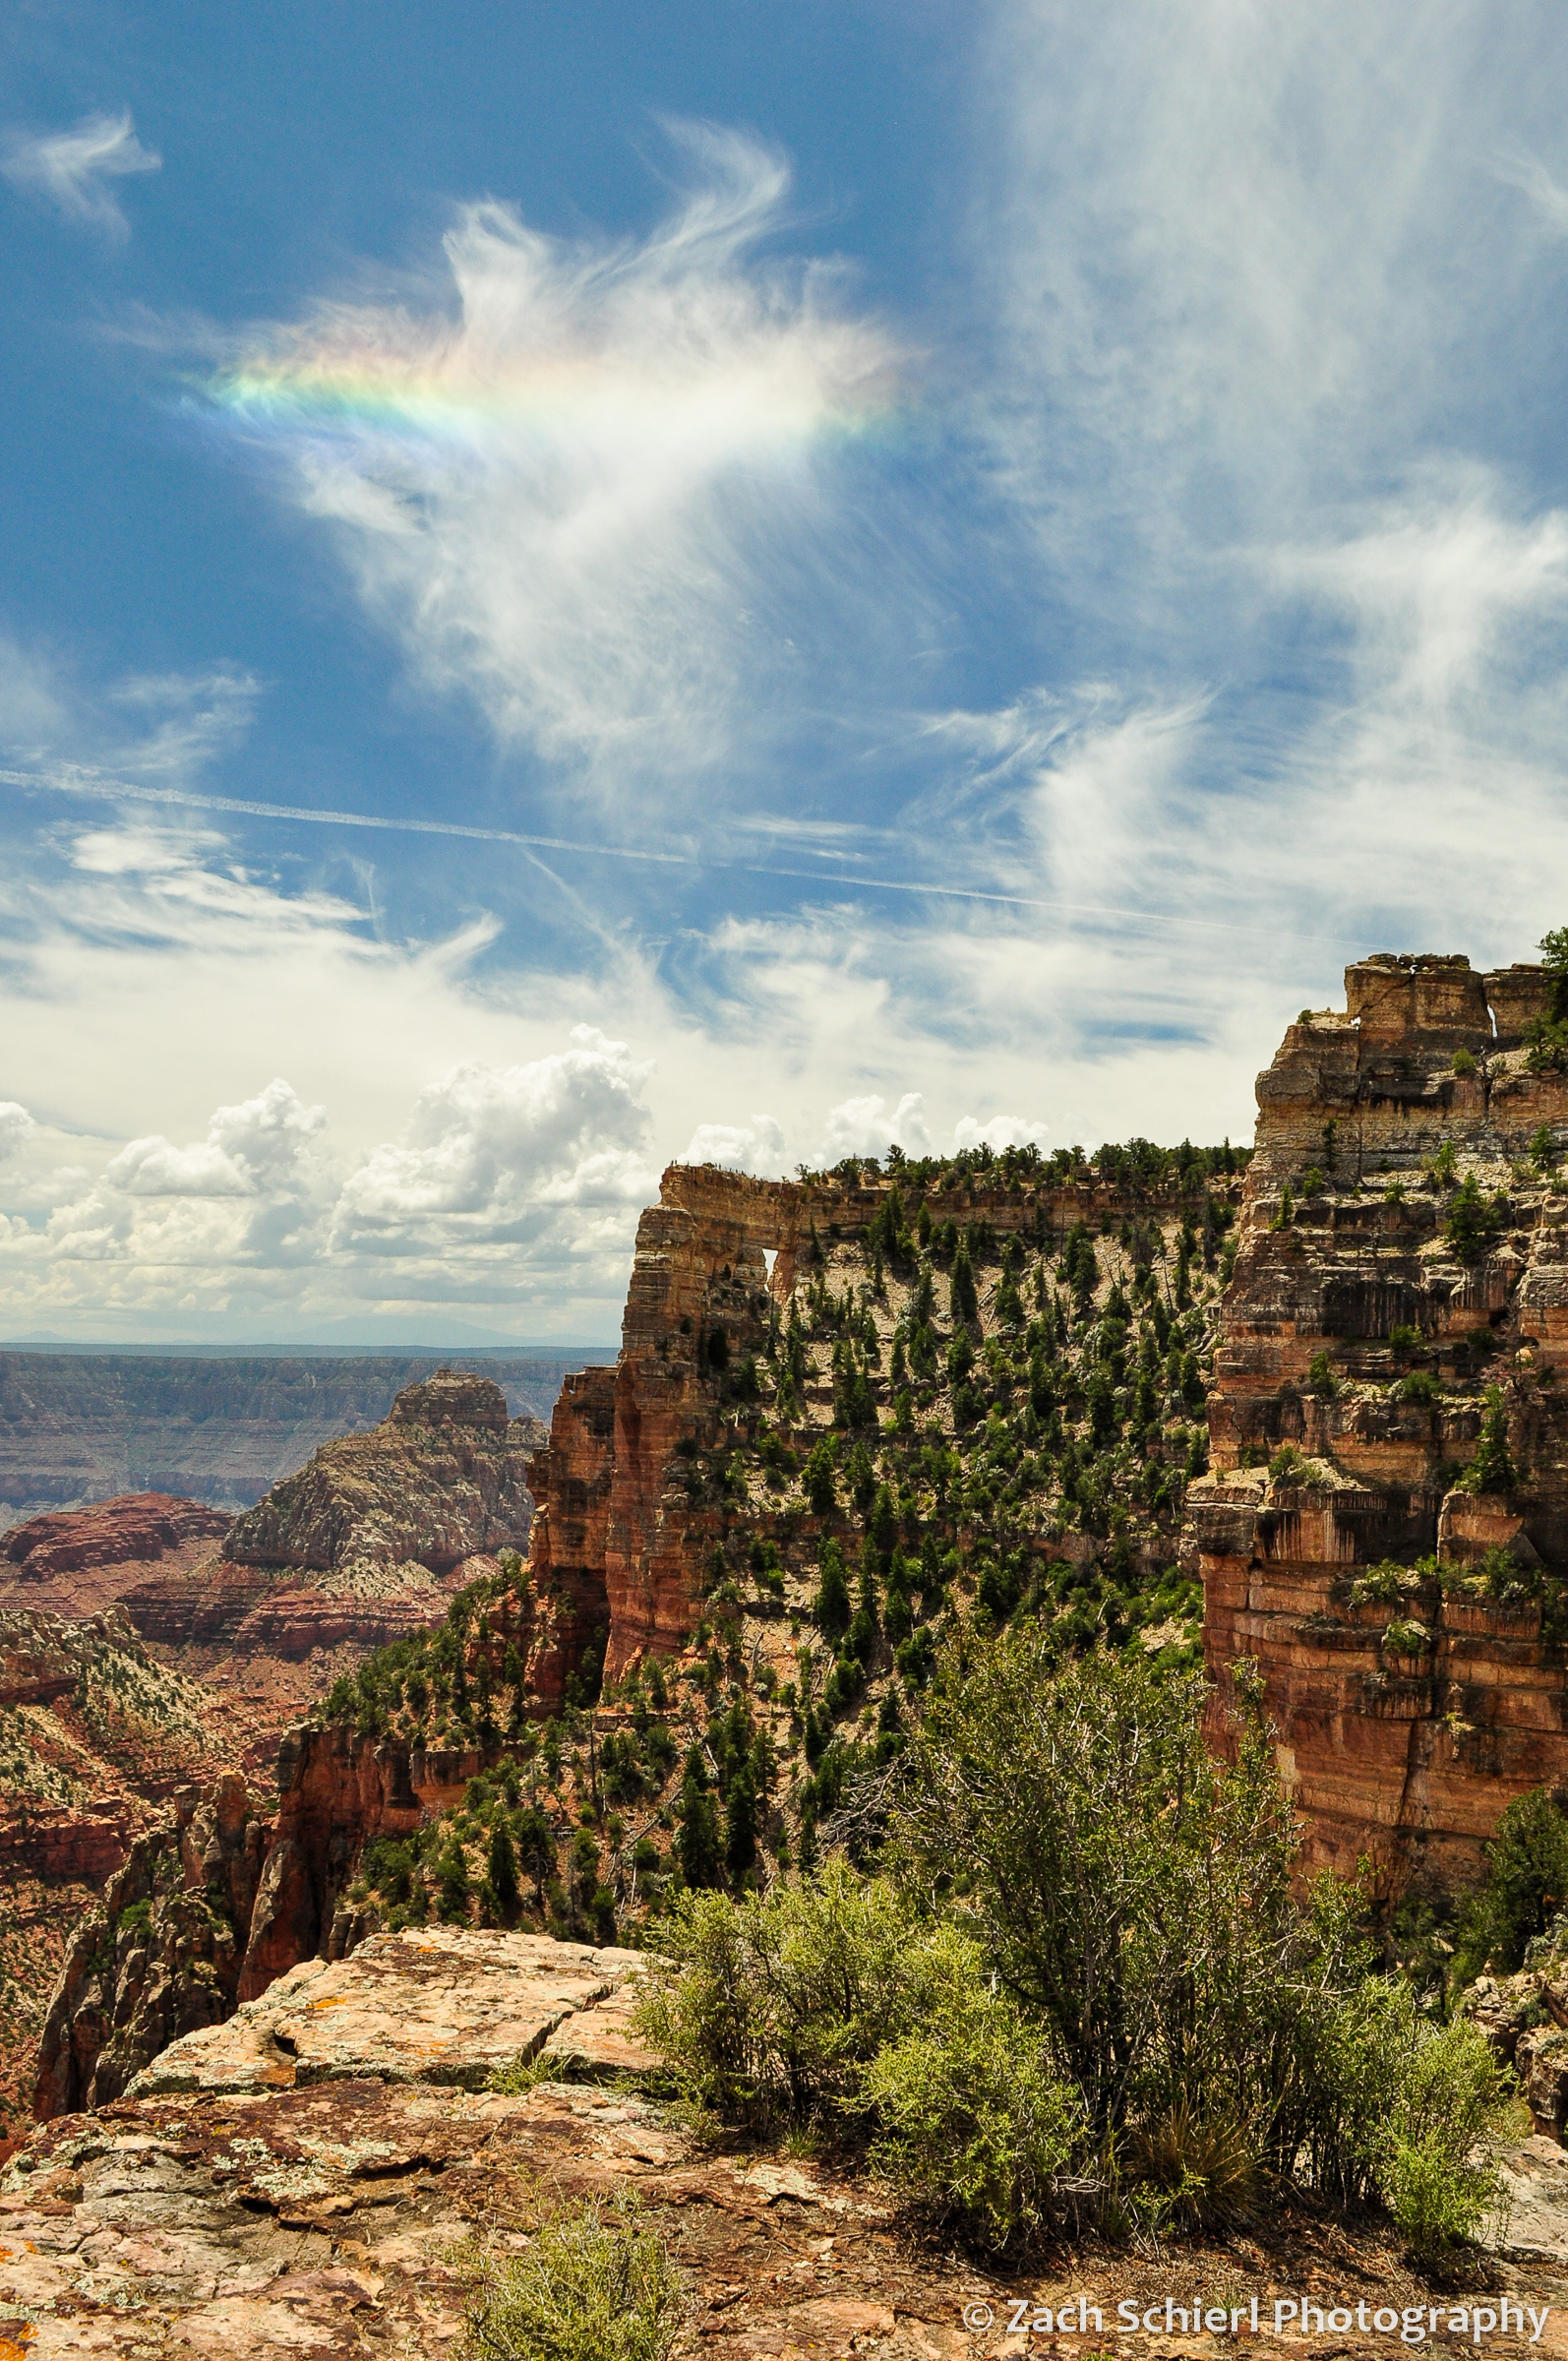
A portion of a circumhorizontal arc over the Angels Window arch on the North Rim of the Grand Canyon, Arizona
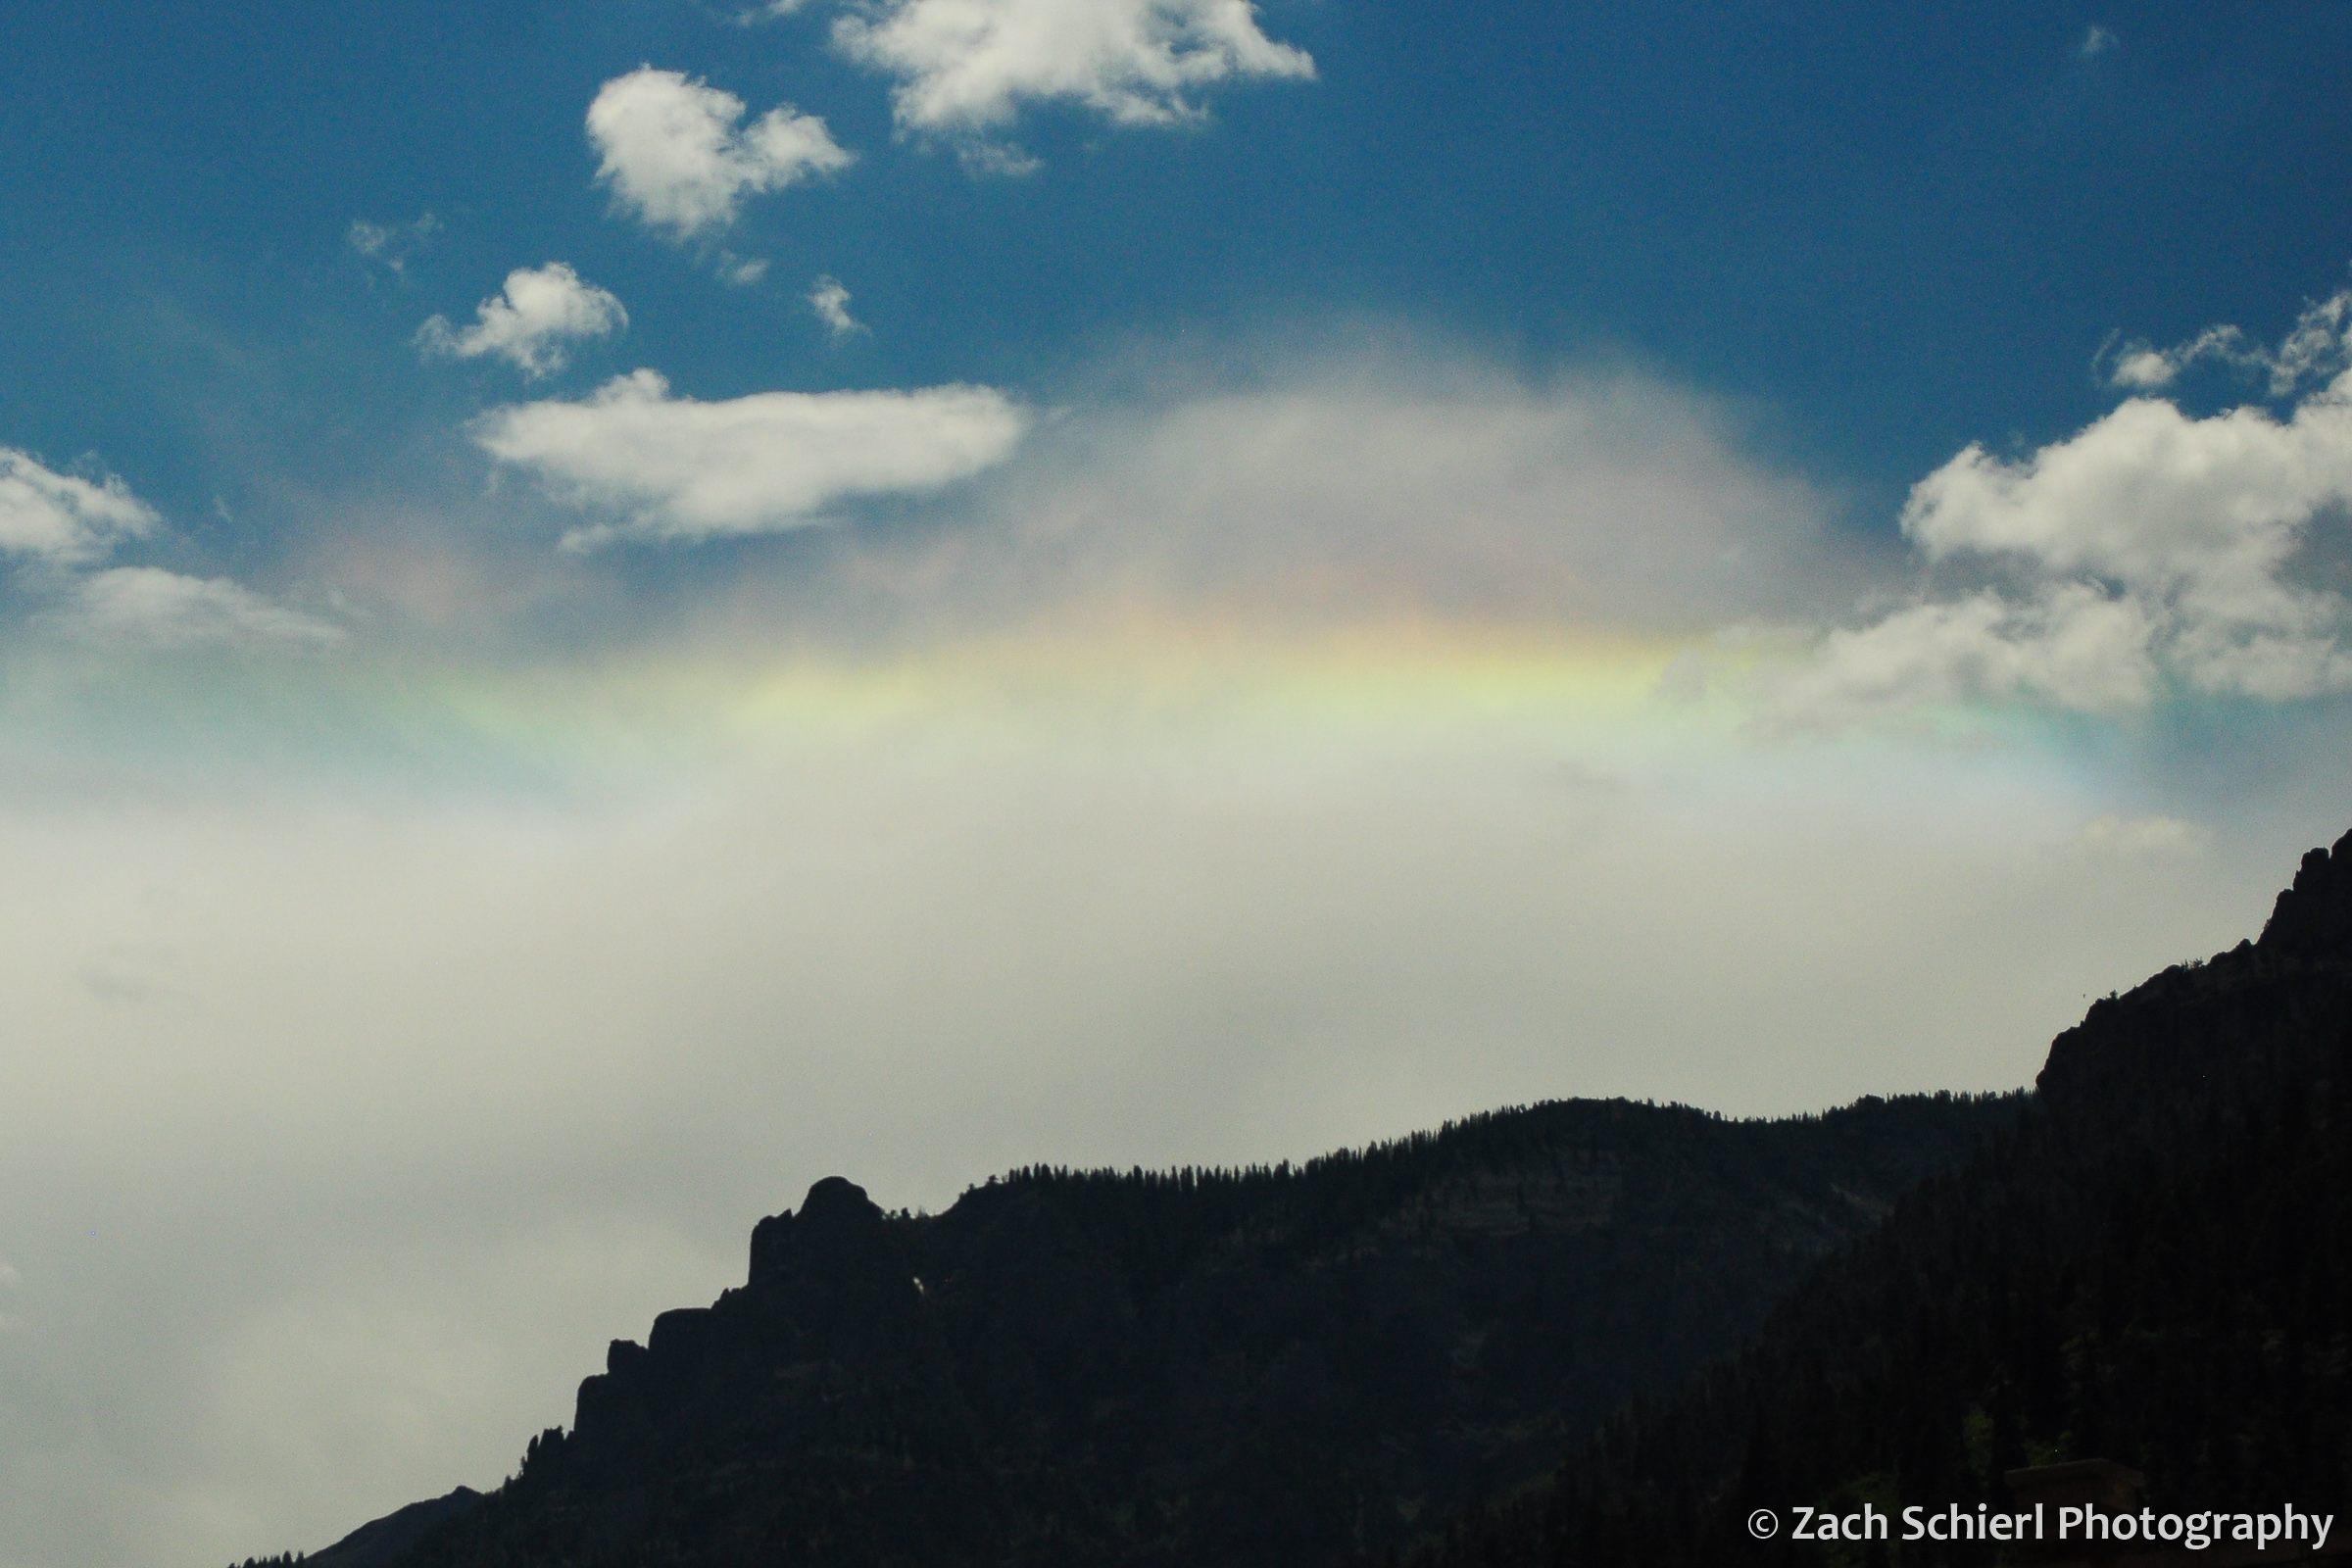
Portion of a circumhorizontal arc over Ouray, Colorado

Small fragment of a circumhorizontal arc (upper left) visible over Mt. Rainier, Washington
In order to see a circumhorizontal arc, the Sun needs to be at least 58° above the horizon. This means that, at least for us here in the mid-Northern latitudes, they are only visible in summertime. The rest of the year the Sun simply doesn’t get high enough in the sky to allow them to be seen, even when the right types of ice crystals are present. (Further north, close to the poles, they can’t be seen at all!) Indeed, a quick review of my photo archives shows that all the photos I have of this phenomenon were taken in late June or July.
Circumhorizontal arcs bear some resemblance to another phenomenon known as cloud iridescence. Unlike the features we’ve discussed so far, cloud iridescence is the result of diffraction (as opposed to refraction and dispersion), which is when light waves are bent around objects. Iridescence occurs at the edges of very thin clouds that are made of very similar sized water droplets or ice crystals. If the cloud layer is thin and uniform enough, light waves bent around these particles interfere with each other, producing a spectrum of colors. Without getting into the nitty gritty details, the colors that you see in an iridescent cloud are more akin to the colors that you sometimes see in soap bubbles or a pool of oil.
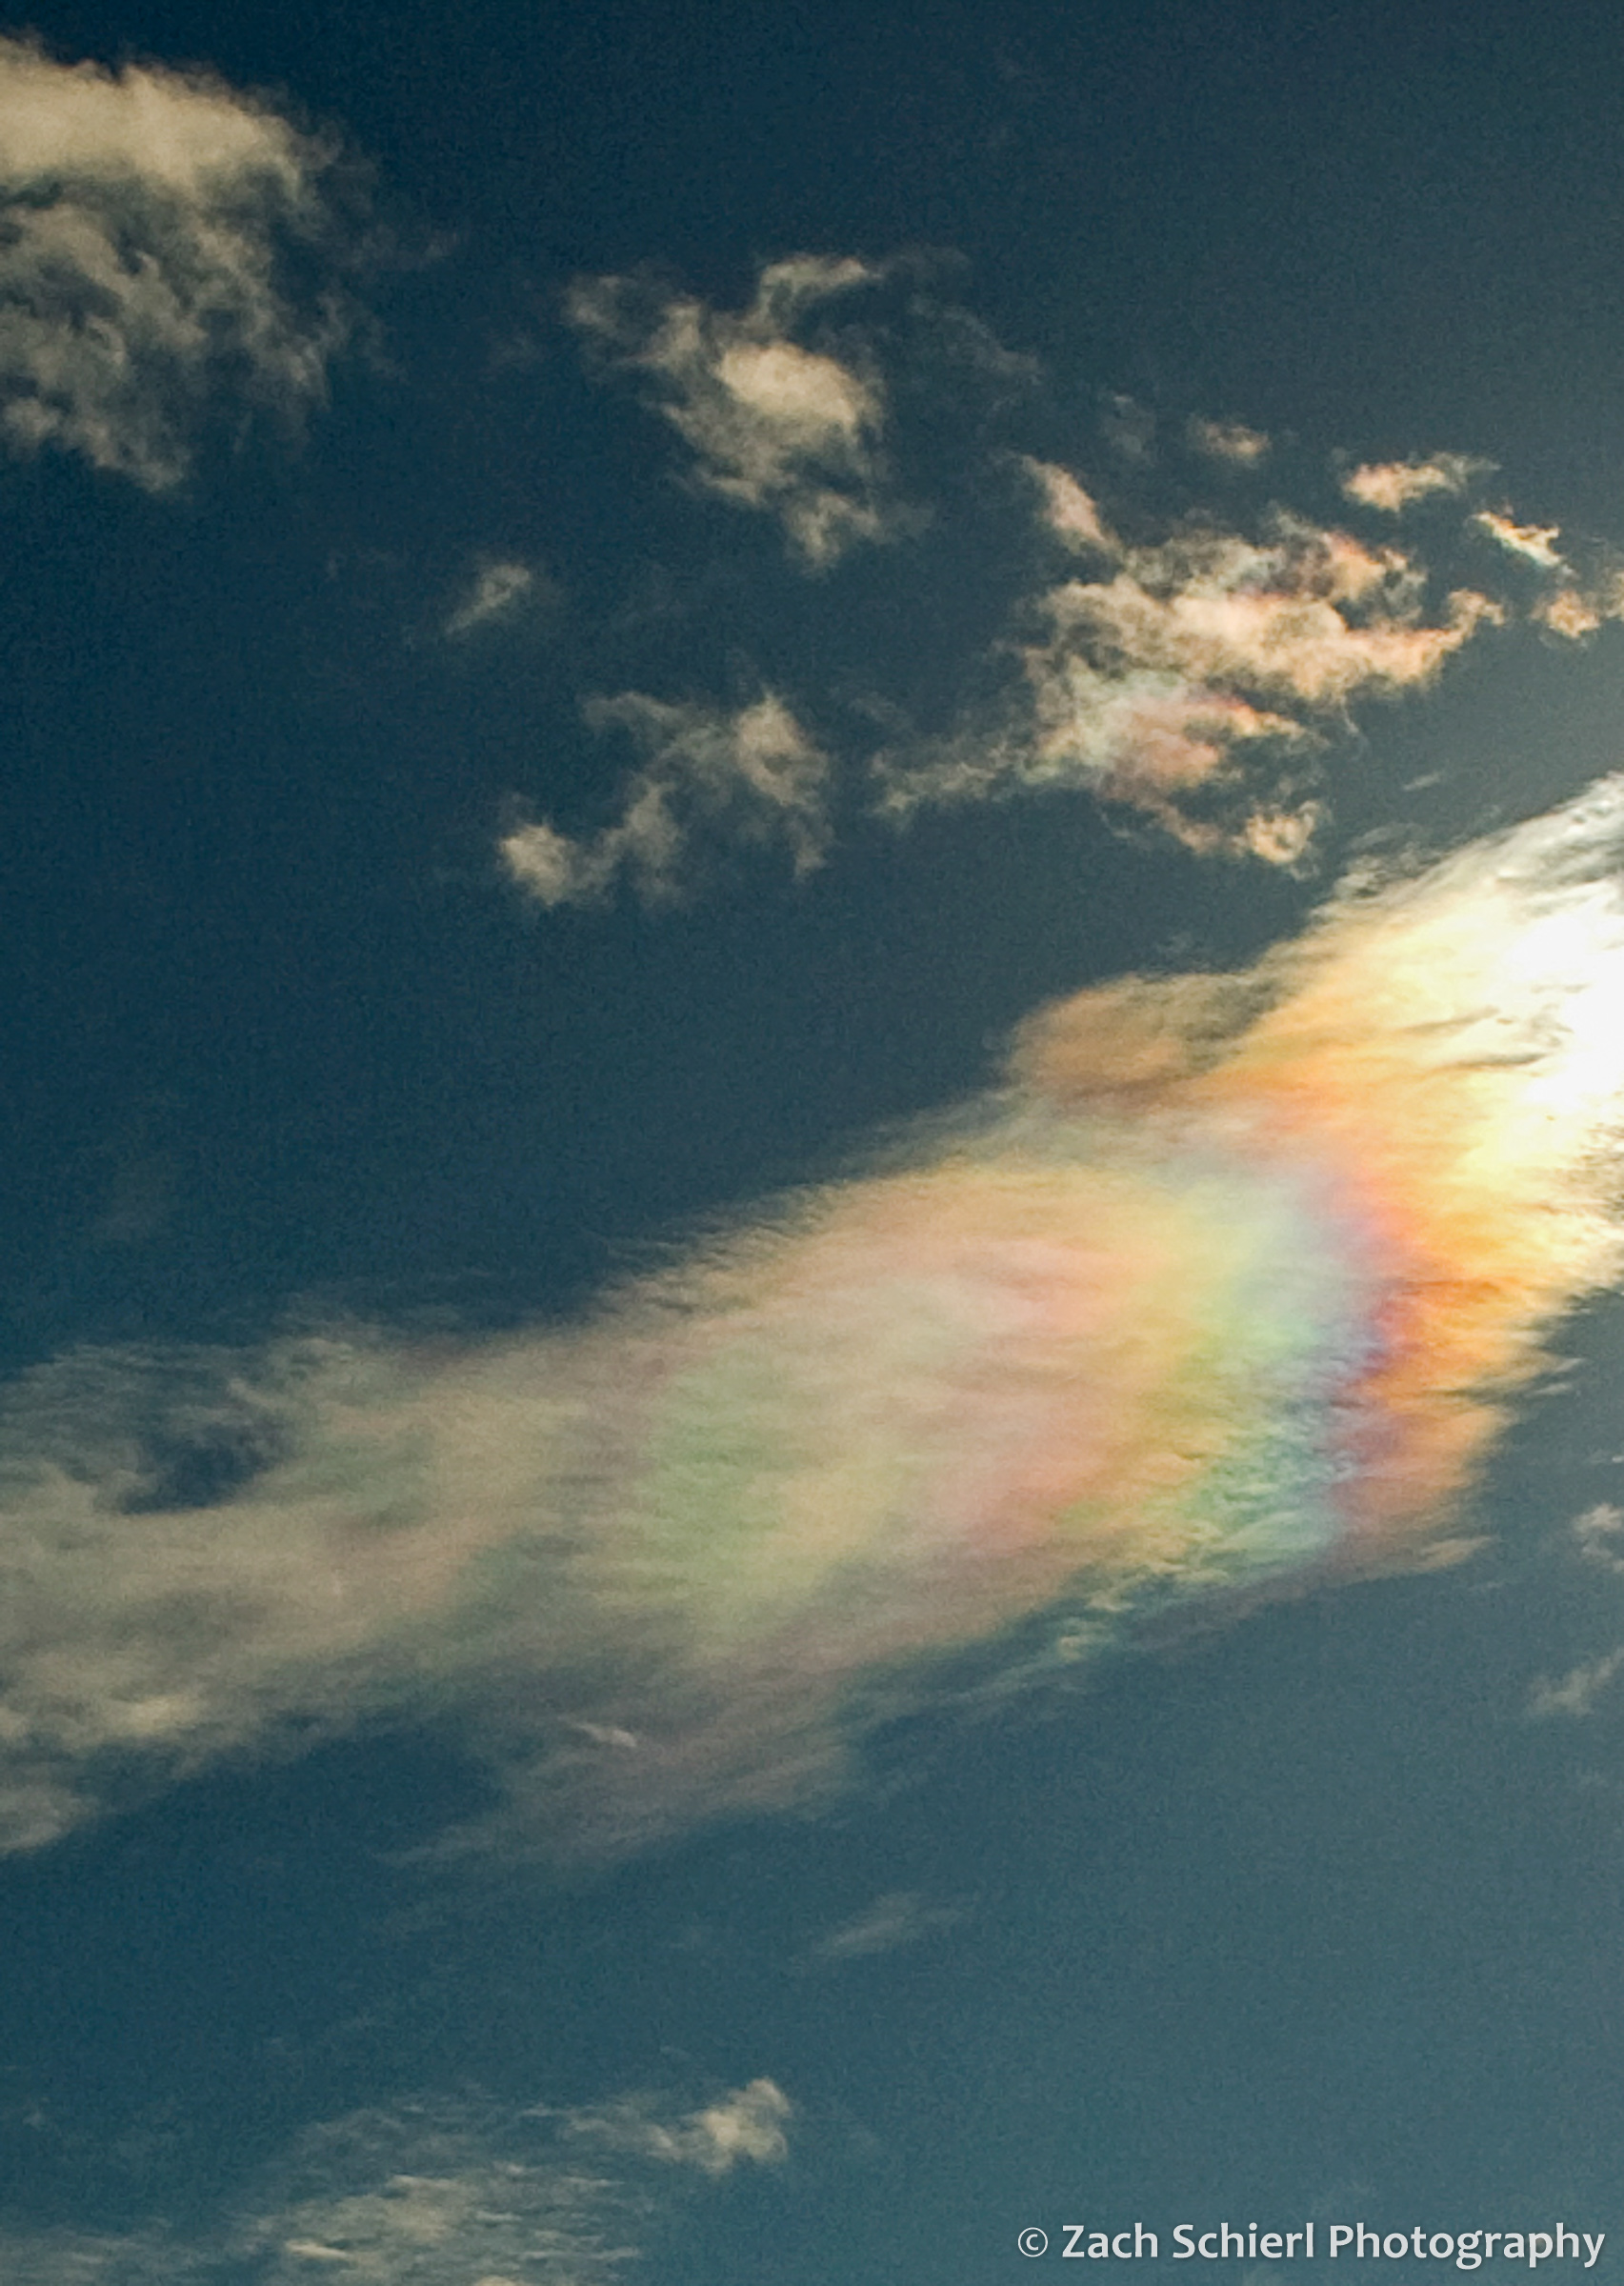
Close up of cloud iridescence over Walla Walla, Washington
Cloud iridescence, Whitman Mission National Historic Site, Washington
Despite their similar appearance, cloud iridescence and circumhorizontal arcs are relatively easy to distinguish from one another. Fragments of circumhorizontal arcs always appear (you guessed it) horizontal relative to the horizon and will always have a bright red band on top. In contrast, cloud iridescence can appear in all sorts of shapes and patterns, and you’ll often see the spectrum of colors repeating themselves multiple times as well, as seen in the photos above.
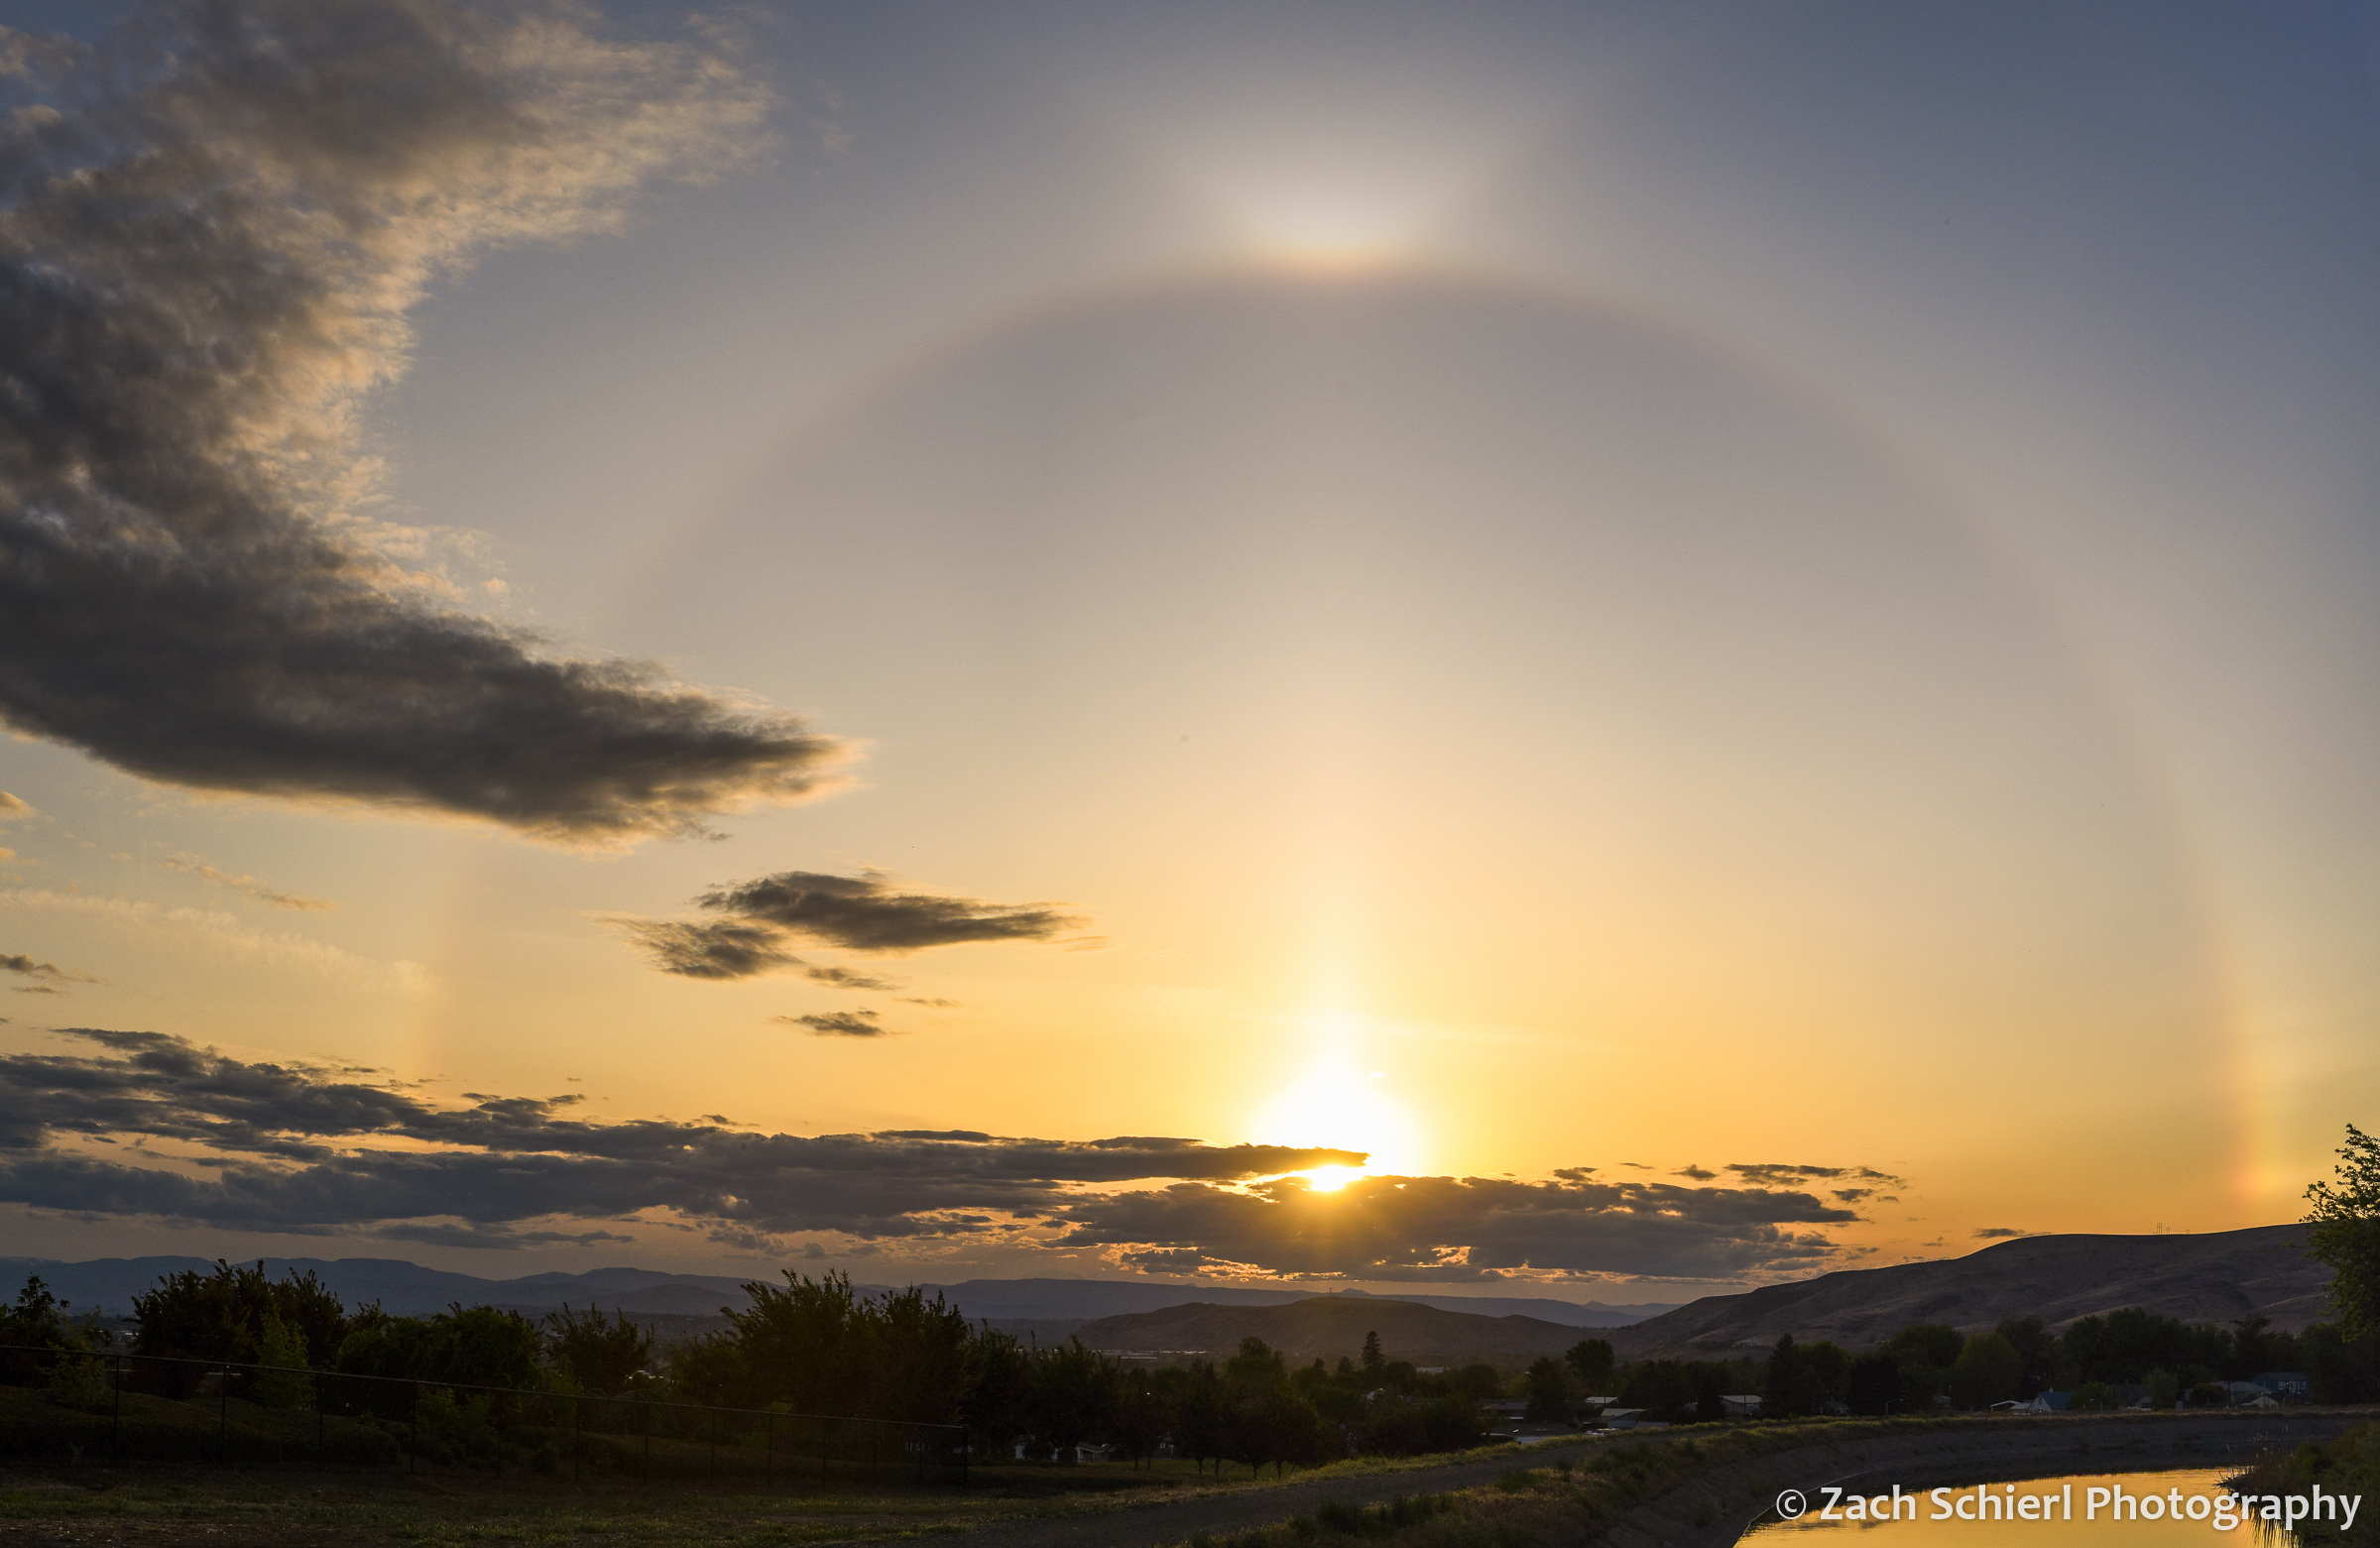
Like rainbows, many other atmospheric phenomena occur only when the Sun is close to the horizon, just before sunset or just after sunrise. Sun pillars, like those in the photos below, are the result of sunlight being reflected off the surface of flat, hexagonal-shaped, ice crystals and redirected back to the observer:
Sun pillar, Grand Canyon National Park, Arizona

Sun pillar, Yakima, Washington
Once in a great while, conditions will be just right and you’ll get a whole truckload of these phenomena all at once, such as on the evening I took the photo below on a recent neighborhood walk as the Sun set over the Cascade range:
Atmospheric phenomena galore! Here, the Sun is surrounded by a 22° halo complete with a tangent arc (the triangular wedge of light at the top of the halo). A sun pillar extends vertically above the Sun, while a sundog (the bright patch on the halo to the right of Sun) is visible at right.
Sundogs and tangent arcs will have to wait until another day. Until then, keep your eyes on the sky. Chances are you’ll spot a nalo, arc, or bow before too long!
Does the Milky Way Really Look Like That?


The summer Milky Way from Cedar Breaks National Monument in southern Utah.
Capturing stunning images of the night sky has become much easier in recent years. The low-light performance of modern cameras (and even my six-year old Nikon D750) far outpaces the capabilities of cameras made even a decade ago. Recently, I was flipping through some old astronomy magazines from the early 2000s and was shocked not only by the (low) quality of the wide-field astrophotography of the day, but also by the incredibly expensive gear used to produce those images at the time. 20 years ago, it was extremely difficult to capture a detailed image of the Milky Way without a high-end camera and an expensive tracking mount.
Today, even some phone cameras can capture passable images of the Milky Way. Stunning panoramas of our galaxy stretching from horizon to horizon are now a dime a dozen on social media. Given the advanced abilities of today’s cameras, it is natural to wonder: “Does the Milky Way really look like that?” Do the spectacular Milky Way images we see plastered across the internet accurately represent what the human eye can see? Or is this incredibly rich detail only visible to a high-tech camera sensor? Or, more nefariously, could these images simply be the result of some Photoshop trickery? The answer, perhaps not surprisingly, is a combination of all three!
Let’s begin by discussing one way in which most Milky Way images are not representative of what the human eye would see: color. The Milky Way will always look monochromatic to the naked eye. However, the reason why has to do more with the physiology of the human eye than any deception on the part of the photographer. Let me explain.
Some photographers do like to crank up the saturation of their Milky Way images beyond belief. Night sky photos with vibrant blues, purples, oranges, and pinks are the tell tale signs of digital embellishment. Rather than point fingers, I’ve created my own version below to illustrate:
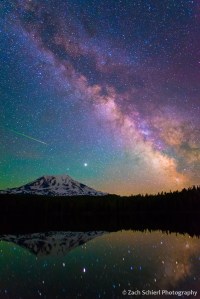
An image of the Milky Way (and a meteor) over Mt. Adams in Washington state…with the saturation slider cranked up to 100 in Adobe Lightroom.
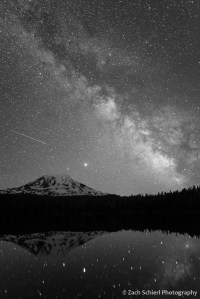
To be clear, these colors aren’t real. This is Photoshop trickery, pure and simple. Here’s what the same image looks like without the saturation increase:

The same image, with natural color.
Much more subdued, certainly, but look closely and you’ll see that there is still some color there! Here’s the good news: those colors ARE real! Notice the pale green sky behind Mt. Adams. That’s airglow, a phenomenon caused by gas molecules in our atmosphere re-emitting energy they absorbed during the day in the form of ultraviolet radiation from the Sun. If you open the photo full screen and look really closely, you can also see some small pink-ish blotches along the plane of the Milky Way. These are hydrogen gas clouds—stellar nurseries if you will—glowing with the characteristic ruddy hue of ionized hydrogen.
Now for the bad news: while these subtle colors are “real”, you’ll never actually see them with the naked eye. Why not? To sum it up, our eyes suck at seeing colors at night. We see using two different sets of cells in our retinas: rods and cones. The cones are what allow us to see color. Unfortunately, the cones only work when there is lots of light entering our eyes, like during the day. Our rods are mostly responsible for our night vision and they are, sadly, colorblind. This is why the night sky (and low light scenes in general), always appear in shades of gray. Only a few of the brightest stars and planets emit enough light to trigger our color-seeing cones. The diffuse glow of the Milky Way does not.
Cameras on the other hand don’t have rods and cones. They are much better at picking up color in low light, so they naturally produce images that are more vibrant than what we actually experience…no editing necessary!
With this in mind, let’s remove the color entirely from our Milky Way image:
Our Milky Way image converted to black and white, a more accurate approximation of what the human eye sees at night.
With the color out of the picture, is this now what the Milky Way actually looks like to the naked eye? Yes…under certain circumstances.
Look closely at the Milky Way in the image above. Notice the detail. It’s complex. It’s interesting. Some parts are brighter, others fuzzier, with dark blotches and voids winding sinuously from upper left to lower right. The Milky Way is a complex place, and this manifests itself in our view of it from Earth. In this regard, this photo actually does a pretty good job of depicting what the Milky Way actually looks like. You CAN see this detail and complexity with your own eyes…provided that a few things are true:
#1: You have a dark sky. For most people, light pollution prevents the Milky Way from being seen in its full glory. If you want to see the kind of detail shown in a photo like this one, you need to be somewhere dark. Not “turn off the porch light” dark. Not “drive out to the edge of town” dark. Not even “drive an hour up into the mountains” dark. Light pollution is incredibly pervasive and the view of the Milky Way can be degraded for literally hundreds of miles from a major city. Even some of the most remote wilderness areas in the United States are still awash in the glow of artificial light. Places like eastern Oregon, central Idaho, northern Nevada, and southern Utah are among the few locales where you can still experience a pristine night sky. A view of the Milky Way from anywhere else simply doesn’t compare.
#2: Your eyes are dark adapted. Remember the rods from earlier? While our rods allow us to see fairly well in low light, they need at least 20-30 minutes of darkness in order to reach peak sensitivity. This period is known as “dark adaptation” and it is a key ingredient of a successful stargazing session. Gazing at the Milky Way before your rods have had time to fully dark adapt is like looking at a Van Gogh or Monet with dark sunglasses on; you miss many of the finest details. If you walk out of a brightly lit RV or tent and look skyward expecting to see the Milky Way like it appears in a photo, you’ll be quite disappointed. Even using a headlamp or checking the time on your phone while waiting for your eyes to dark adapt can inhibit the process. For this reason, astronomers typically use red lights at night because our rods are less sensitive to that color, making it easier to preserve night vision.
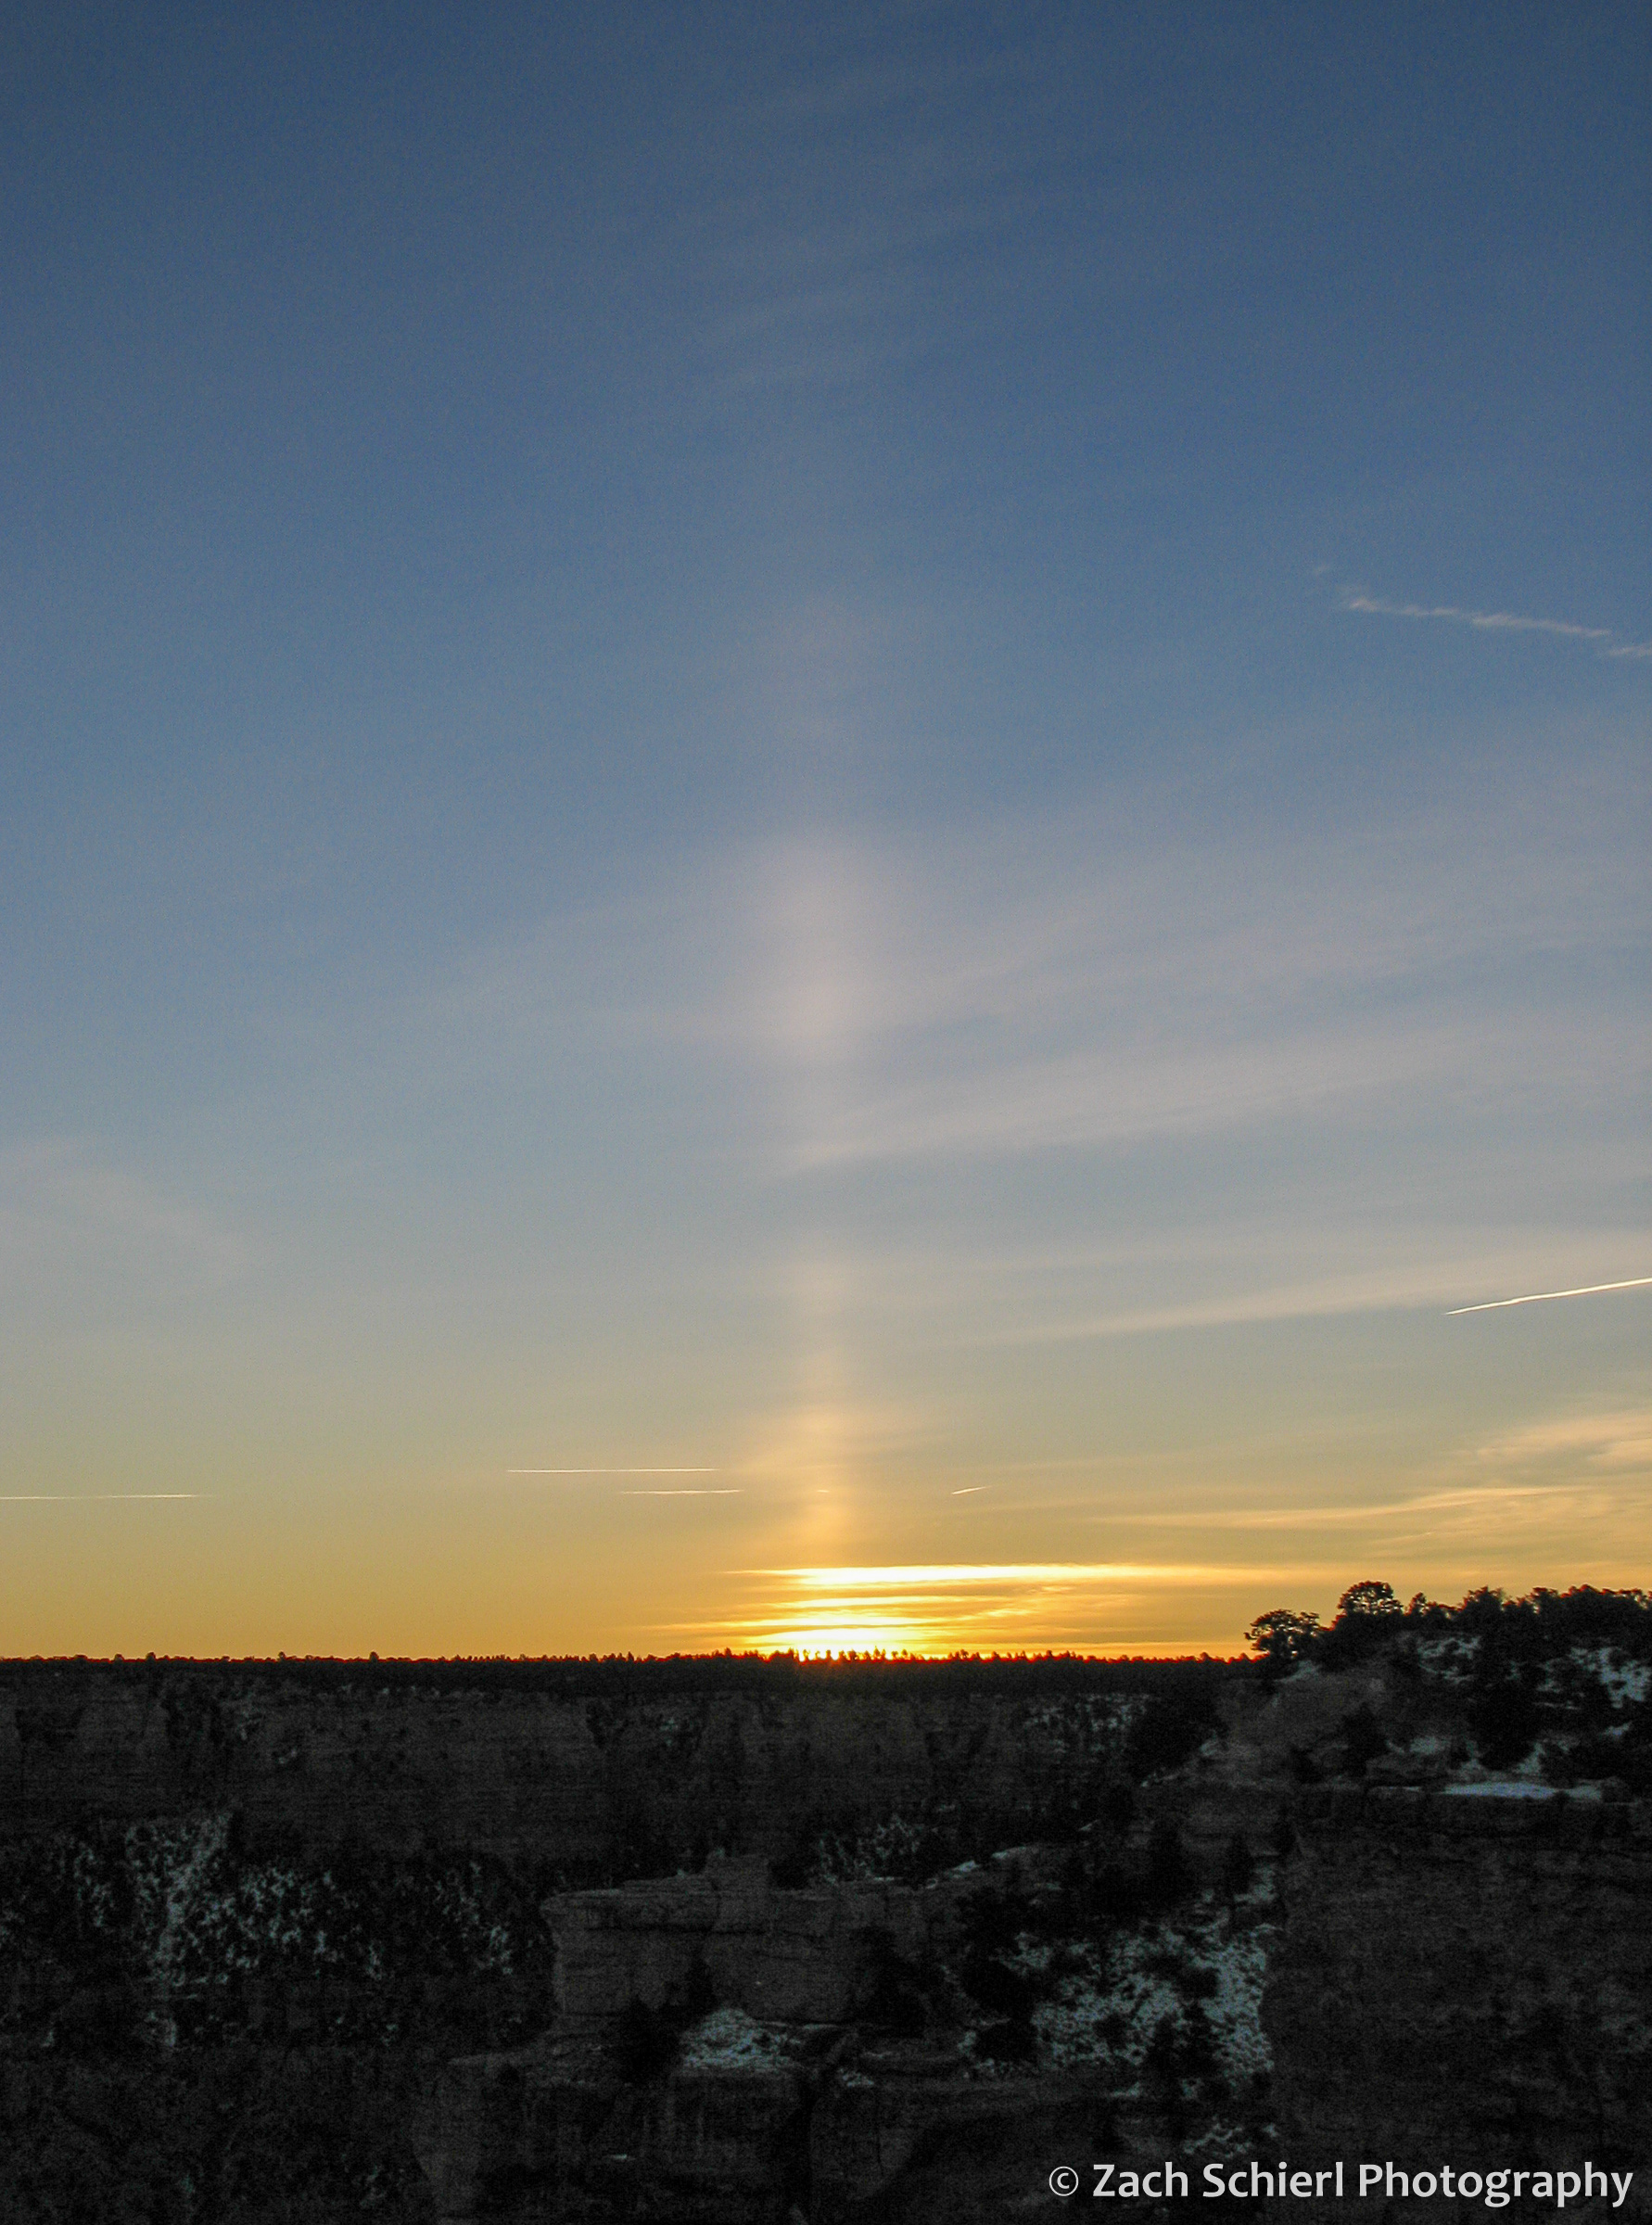
#3: You are in the right place at the right time. We live in the suburbs of the Milky Way galaxy. When we look toward the center of the Milky Way (downtown), it looks brighter, because we are looking at a greater concentration of stars, gas, and dust. When we look away from the center, it looks dimmer. Images like the one I’ve been using in this post are taken looking downtown…toward the galactic center. This portion of the Milky Way is only visible during certain times of year. In late fall, it’s behind the Sun, making it rather difficult to photograph or see. Late evening in the summer and early fall, or early morning in the Spring is the ideal time to catch it. At other times of year, when the galactic outskirts grace our sky, the Milky Way is much more ho-hum. You’ll also want to avoid the Moon, whose glow will mostly overwhelm the diffuse and relatively faint Milky Way.
If all three of these things are true, then yes, the black and white image above is a good representation of what the Milky Way looks like to the naked eye. Sadly, only about 20% of North Americans can even see the Milky Way from their homes, much less see it under ideal circumstances. Light pollution has masked the view of our home galaxy to the point that most of us no longer know what it should look like. Ecologists call this “shifting baseline syndrome”, a phenomenon in which each successive generation comes to regard the state of the environment around them as “normal”. In other words, as we degrade our environment, we gradually forget what things used to be like, or, in this case, look like.
While increasingly rare, such a view of the Milky Way is one of the most spectacular sights in the natural world. I vividly remember a backpacking trip I took over a decade in Aoraki/Mt. Cook National Park in New Zealand. The Milky Way appeared so bright that it cast shadows on the ground, and I was able to read a book (albeit barely…) by its light. Oddly enough, sometimes the “darkest” skies are actually the brightest because so many stars are visible.
Fortunately, light pollution is an easy problem to fix. Many outdoor light fixtures are poorly designed and allow light to escape upward into the night sky. While our modern lives certainly require light at night, that light is almost always needed on the ground, not up in the sky. Illuminating the sky or the crown of a tree makes no one safer or more secure from hazards real or imagined. Light fixtures that direct light downwards (known as “fully shielded” fixtures) eliminate much of the problem. Cities that use such lights, like Flagstaff, Arizona (where I grew up), produce substantially less light pollution than other cities of comparable population. You can see the summer Milky Way from downtown Flagstaff…a city of nearly 100,000 people. Simple actions can go a long ways toward preserving the view of the Milky Way for future generations. (For more on what you can do to combat light pollution, check out the great work being done by the fine folks over at the International Dark Sky Association.)
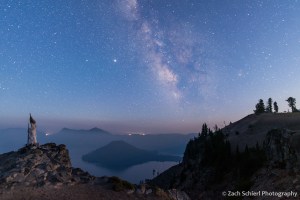
A view of the Milky Way over Crater Lake in southern Oregon. A layer of smoke from the 2020 Oregon & California wildfires is seen near the horizon.
